Troubleshooting minor window problems
· María Fernández · Repair and maintenance · 19 min read
Windows break at the most inopportune moments—the sash jammed before vacation, the handle broke on a Friday evening, or a draft hits the windows in winter. Most problems look worse than they really are. In 80% of cases, a simple adjustment or replacement of a small part is needed, which can be done yourself in half an hour. Let’s figure out how to quickly restore your windows to life.
Window won’t close or closes with difficulty
Symptoms
The handle is difficult to turn, requiring force or pressure on the sash. The window doesn’t close smoothly, but jerks. A grinding or creaking sound is heard when closing.
Causes
Sash has sagged—under its own weight or from frequent use, the hinges have loosened slightly, causing the sash to drop 2-3 mm. The bottom of the sash touches the frame when closing.
Sash has shifted to the side — Temperature changes or uneven loads on the hinges have caused the sash to shift to the right or left. The edge of the sash is catching on the frame.
Dirty mechanisms — Dust and dirt in the locking pins and strike plates are creating resistance. The mechanism is difficult to operate.
Dried grease — Old grease has thickened or dried out. Metal parts are rubbing without a protective film.
Too much pressure — The sash is set to winter mode with maximum pressure. The seals are compressed too much, creating resistance.
Solution
Step 1: Check the position of the sash Close the window and inspect the gap between the sash and frame around the entire perimeter. The gap should be uniform—approximately 3-5 mm everywhere.
If the gap is uneven (smaller at the bottom than at the top, or wider on one side), the hinges need to be adjusted.
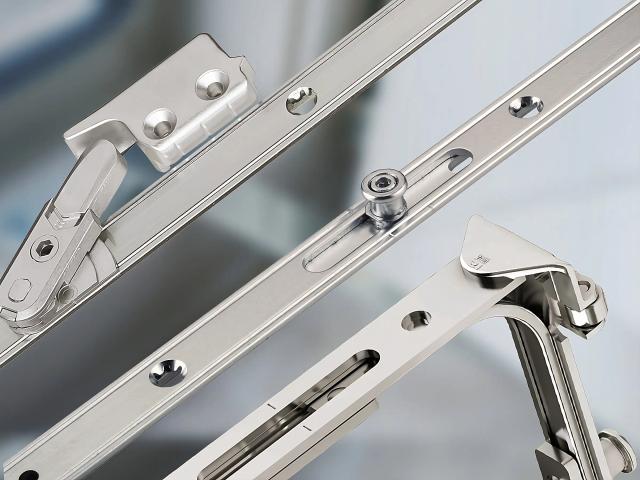
Step 2: Adjust the Hinges
You will need a 4mm Allen key.
Lifting a sagging sash:
- Open the sash
- Remove the decorative cover from the bottom hinge (pry it off with a screwdriver or remove it by hand)
- Locate the adjustment screw on the top of the hinge (the Allen key hole)
- Turn clockwise to raise the sash, counterclockwise to lower it
- Make 1-2 turns, check the result
- Raise the sash by 1-2 mm
Moving the sash left and right:
- Locate the side adjustment screw on the hinge (on the side)
- Turning clockwise draws the sash toward the hinge, counterclockwise to move it away
- Adjust both hinges (upper and lower) equally for uniform movement
Step 3: Clean and lubricate the mechanisms
- Open the sash, wipe off any dust from the end face
- Apply 1-2 drops of WD-40 or a special hardware lubricant On each locking pin (oval projections on the end)
- Apply lubricant to the strike plates on the frame
- Close and open the window 5-6 times to distribute the lubricant
Step 4: Loosen the clamp (if in winter mode)
- Locate the locking cams (pins) on the end of the sash
- Turn them so the mark faces the street (summer mode)
- Use pliers or an Allen key, depending on the type of cams
- Now the handle will close easier
When a repairman is needed
- The sash is deformed - it is visible to the naked eye that the profile is bent
- Adjusting the hinges does not help - the sash touches the frame even after being raised
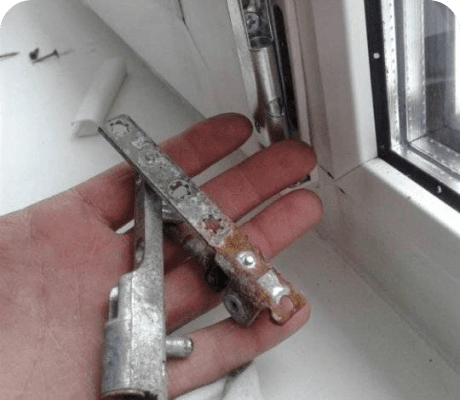
- The hinges themselves are broken - cracks, broken parts
- The window is large (more than 2 meters high) - it is better not to risk adjusting it yourself
The handle does not turn or is jammed
Symptoms
The handle doesn’t move at all or only moves to one position. The handle turns, but the window doesn’t open. The handle wobbles and spins freely.
Causes
The lock has been activated - almost all modern windows have a lock against accidental opening. If you try to turn the handle while the sash is open, the mechanism becomes blocked.
The mechanism is jammed - the locking pin has not engaged with the groove in the strike plate, but is misaligned. The mechanism is stuck in an intermediate position.
The handle square has broken - the metal rod inside the handle that transmits force to the locking mechanism has broken or fallen out.
Contamination - dirt in the mechanism is blocking movement.
Solution
If the handle doesn’t turn at all:
Step 1: Check the locking mechanism
- Locate the locking mechanism—a metal plate or tab on the end of the sash near the handle (above or below the handle)
- Press the locking mechanism against the end of the sash with your finger
- Try turning the handle while holding the locking mechanism down
- If the handle moves, the locking mechanism has been activated due to improper handling
Step 2: Unlock correctly
- The sash should be closed
- Press the locking mechanism
- Turn the handle to the horizontal position (the “open” position)
- Release the locking mechanism
- Open the sash
- Now close the sash correctly—first the sash to the closed position, then the handle down
If the handle is loose:
Replacing the handle:
- Rotate the decorative cover at the base of the handle 90 degrees
- Unscrew the two Phillips-head screws under the cover Screwdriver
- Remove the old handle by pulling it toward you
- Buy a new handle at a hardware store (15-30 euros, bring the old one with you as a reference)
- Install the new handle, tighten the screws, and replace the cover plate
If the handle spins freely:
- The problem is a broken square (the metal rod inside)
- Remove the handle (see above)
- Inspect the square - is it broken or has come loose from its socket
- If it has come loose, reinsert it and install the handle
- If it is broken, buy a new handle with a square
When you need a repairman
- The internal locking mechanism in the frame is jammed (not the handle, but the lock itself)
- The locking pins inside the profile are broken
- The handle mechanism is broken inside the profile and cannot be removed
Draft coming from a closed window
Symptoms
Air movement is felt near a closed window. In winter, a cold draft comes from the cracks. A whistling sound is heard in strong winds. It’s colder near the window than the rest of the room.
Causes
Worn seals — the rubber gaskets around the sash have lost their elasticity, hardened, and cracked. The seals do not provide a tight seal.
Weak sash clamping — the sash is set to summer mode or the mechanism has become loose. The sash does not fit tightly against the frame.
Gaps in the mounting joint — cracks have formed in the sealant between the frame and the wall, or the foam has deteriorated.
Deformation of the sash or frame — temperature changes have caused the plastic to warp slightly, creating gaps.
Solution
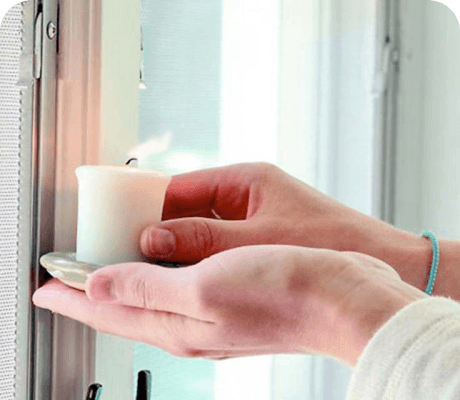
Step 1: Find the draft
- Close the window
- Light a candle or lighter
- Slowly move the flame around the perimeter of the sash at a distance of 2-3 cm
- Where the flame deflects is the draft
- Mark these spots with a pencil
Step 2: Check the seals
- Inspect the rubber seals in the draft areas
- Run your hand over them – the rubber should be soft and flexible
- Cracks, hardened areas, and peeling are signs of wear
If the seals are worn:
- Buy new seals (sold by the meter at hardware stores, 3-5 euros per meter)
- Remove the old rubber – it simply pulls out of the groove
- Clean the groove of dirt
- Insert the new seal into the groove around the entire perimeter of the sash
- Start from the corner, do not stretch the rubber Press in with your fingers or a blunt spatula.
- Trim off any excess, making the joint at a 45-degree angle.
Step 3: Increase sash pressure
- Set the cams to winter mode (see the section on tight closing)
- Turn all cams so the mark faces the room.
- Close the window—the handle will tighten, increasing the pressure.
Step 4: Check the pressure around the perimeter
- Close the sash on a sheet of paper.
- Try pulling the paper out at different points around the perimeter.
- The sheet should come out with difficulty or tear at all points.
- If the sheet comes out easily in one area, the pressure is weak.
- Adjust the cams in that area more firmly or adjust the pressure on the hinges.
Step 5: Check the mounting joint
- Inspect the sealant between the frame and the reveal from the outside.
- Cracks or peeling indicate the sealant needs to be renewed.
- Remove the old sealant. Knife
- Clean the surfaces of dust
- Apply new silicone sealant (use a neutral silicone, not an acid)
- Smooth the seam with a wet finger or a putty knife
When a professional is needed
- Blow-through remains after replacing the seals and tightening the clamp
- Visible gaps between the frame and the wall inside the room indicate an installation problem
- The sash or frame is clearly deformed
- Blow-through from under the window sill or drip edge indicates the installation seam needs to be redone
Condensation on the inside of the glass
Symptoms
Water droplets form on the inside of the glass. The glass fogs up from below or completely. Water drips onto the windowsill. In winter, frost or ice forms on the glass.
Causes
High indoor humidity — cooking, drying laundry, and many people increase the humidity to 70-80%. Condensation forms when warm, moist air comes into contact with cold glass.
Poor ventilation — there is no fresh air supply, allowing moisture to accumulate. Plastic windows are airtight, unlike older wooden windows, which let air through cracks.
Cold glass — single-pane glass or glass without a low-e coating. The inner surface of the glass is cold, causing moisture to condense.
A wide windowsill blocks the radiator. Warm air does not rise to the window, and the glass does not heat up. Flowers on the windowsill evaporate a lot of moisture. The soil in the pots is an additional source of moisture.
Solution
This isn’t a window problem, but a problem with the indoor microclimate. The windows are working properly; condensation is a consequence of physics.
Step 1: Reduce humidity
- Ventilate 2-3 times a day for 10-15 minutes
- Use the kitchen hood when cooking
- Dry laundry on the balcony or in the bathroom with the door and hood closed
- Remove some flowers from windowsills or reduce watering
Step 2: Ensure air circulation
- If the windowsill is wide, install a ventilation grille in it
- Do not cover radiators with decorative screens
- Move furniture 5-10 cm away from windows
- Do not cover radiators under windows with thick curtains
Step 3: Install air inlets
- Air inlets in windows ensure constant air exchange
- Installation costs €80-120 per window
- Air inlets with automatic adjustment open further as humidity increases
Step 4: Use micro-ventilation
- Do not turn the handle all the way up and 45 degrees (if the hardware supports it)
- The sash will open 3-5 mm—enough for air exchange without drafts
- Or use the tilt position with the minimum angle limiter
Step 5: Buy a dehumidifier
- A household dehumidifier for a room costs 150-300 euros
- Reduces humidity to a comfortable 50-60%
- Especially effective in winter and in bathrooms
When is this a serious problem
- Condensation forms when the humidity in the room is below 60%—the glass unit is too cold
- The windows are new, but there was no condensation on the old wooden ones—ventilation is needed
- Mold has appeared on the slopes—urgently address the ventilation and humidity issue
- The glass unit is fogged INSIDE (between the panes)—a leak has occurred, the glass unit needs to be replaced
The glass unit is fogged inside (between the panes) (glass panes)
Symptoms
Moisture and fog are visible between the panes of glass inside the insulated glass unit, and this cannot be wiped off. Sometimes, water droplets or streaks are visible inside the insulated glass unit.
Causes
Insulated glass unit leakage - the seal around the perimeter is broken. Moisture has penetrated inside, and the desiccant (granules in the frame between the panes) is overfilled and cannot cope.
Causes of leakage:
- Manufacturing defect
- Damage during transportation or installation
- Strong impact on the glass
- Extreme temperature changes
- Poor-quality materials (cheap sealant)
Solution
The insulated glass unit cannot be repaired - only replaced.
Attempts to remove moisture from the inside by drilling holes and blowing through are a temporary measure, lasting 2-3 months. The moisture will then return because the seal is broken.
Step 1: Check the warranty
- Double-glazed windows have a 5-10-year warranty against leaks.
- If the windows are new, the manufacturer is obligated to replace them free of charge.
- You will need documentation for the windows and proof that the damage is not mechanical.
Step 2: Order a new double-glazed window
- Measure the dimensions of the double-glazed window (width, height, thickness)
- Or call a surveyor (often free of charge)
- Double-glazed windows are manufactured in 5-10 business days.
- Cost: €60-€150 per m², depending on the configuration.
Step 3: Replace the double-glazed window
- You can replace it yourself or call a professional (€40-€60 for labor).
- Remove the glazing beads (plastic strips that hold the double-glazed window in place).
- Pry the glazing beads from the middle of the sash with a putty knife or chisel.
- Start with the long side glazing beads.
- Remove the old double-glazed window.
- Install spacers (plastic plates). Around the perimeter to center the new glass unit.
- Install the new glass unit.
- Hammer the glazing beads back in with a rubber mallet (start with the short ones).
You can’t do this yourself.
Replacing a glass unit requires care. You can break the glass or damage the frame. If you’re unsure, call a professional. The work costs 40-80 euros, but the results are guaranteed.
The sash rubs against the frame when opening
Symptoms
When opening, the sash rubs against the frame, making a grinding noise. There are visible scuffs on the plastic of the sash or frame. The sash opens with difficulty or gets stuck.
Causes
Sagging sash — the sash has sagged under its own weight. This is especially common with large and heavy sashes.
Thermal deformation — the plastic has expanded due to heat, narrowing the gaps.
Hinge wear — the hinges have become loose from frequent use. ### Solution
Step 1: Locate the rubbing area
- Slowly open the sash and observe where it touches the frame
- Rubbing is usually at the bottom, on the side opposite the hinges
Step 2: Lift the sash
- Use a 4mm Allen key
- Open the sash, remove the cover from the bottom hinge
- Locate the adjustment screw at the top of the hinge
- Turn it clockwise 3-5 turns
- Close the sash, check to see if the rubbing decreases or disappears
- If necessary, lift it an additional 2-3 turns
Step 3: Move the sash toward the hinges (if rubbing is on the opposite side)
- Locate the side adjustment screw on both hinges
- Turn it clockwise; the sash will be pulled toward the hinges
- Adjust both hinges equally
- Check the results
When to Call a Repairman
- Adjustment doesn’t help
- Visible profile deformation
- Hinges are broken or torn from the profile
- The sash is very large and heavy (over 100 kg)
Seal has come loose
Symptoms
The rubber seal has come loose from the profile, is hanging, and is falling out of the groove. A draft has appeared at the point of detachment.
Causes
Adhesive layer wear - Over time, the adhesive has dried out and lost its effectiveness. This wears especially quickly on the south-facing side due to the sun and heat.
Incorrect installation - the seal was poorly secured initially.
Poor-quality seal - cheap rubber without a proper adhesive layer.
Solution
Temporary solution (if the seal is in good condition):
- Buy rubber glue or a universal adhesive like Moment
- Remove the seal from the groove
- Clean the groove of old glue and dirt with alcohol
- Apply a thin layer of glue to the groove
- Press the seal back in
- Press firmly and leave for 2-3 hours to dry
Correct solution (if the seal is old):
- Replace the entire seal (see the section on blowing)
- New seals are held in the groove by their shape, without glue
- Cost 3-5 euros per meter
- A standard window requires 6-8 meters
It’s easy
Replacing a seal is one of the simplest jobs. Anyone can do it. No tools are needed, just your hands.
Windows creak or rattle
Symptoms
A creaking sound is heard when opening or closing. In the wind, the windows rattle or rattle. Unpleasant sounds are heard with each movement of the sash.
Causes
Lack of lubrication — the mechanisms are running dry, metal rubbing against metal.
Worn seals — hardened rubber squeaks when the sash moves.
Weak seal — the sash does not fit tightly and vibrates in the wind.
Poorly secured double-glazed windows — there is a gap between the double-glazed window and the frame, causing the glass to rattle when subjected to vibrations.
Solution
To prevent creaking during movement:
- Lubricate all moving parts of the hardware (hinges, latches, and stays)
- Apply silicone spray to the seals
- Open and close the sash 10 times to distribute the lubricant
To prevent rattling in the wind:
- Strengthen the sash clamping force by setting the eccentrics to winter mode
- Check that all locking points are working
- If the glass unit is rattling, place special spacers between the glass unit and the frame (available at hardware stores)
Broken mosquito net
Symptoms
The screen fabric is torn. The fasteners are broken. The screen frame is bent or cracked.
Causes
Mechanical damage - claws (cats), piercing with a sharp object, or strong pressure.
Sun damage — the plastic threads of the canvas were damaged by UV radiation within 5-7 years.
Wind load — strong winds bent the frame or tore out the fasteners.
Solution
Small holes in the screen:
- Buy a mosquito net repair kit (5-8 euros)
- Apply a patch to both sides of the hole
- Or sew the hole with thin fishing line
Large damage to the screen:
- Replace the entire screen
- Buy screens cut to size at a hardware store (10-20 euros per m²)
- Remove the old rubber cord around the frame perimeter (pry it off with a screwdriver)
- Remove the old screen
- Place the new screen on the frame, leaving 2-3 cm at the edges
- Press the rubber cord into the groove around the perimeter with a special roller (or the blunt side of a knife)
- Pull the screen evenly, starting from one side
- Trim off the excess screen with a knife
Broken fasteners:
- Buy new fasteners (Z-shaped brackets, 2-4 euros per set)
- Unscrew the old ones and screw the new ones to the window frame
- Reinstall the screen
Bent Frame:
- If the frame is aluminum, try to gently straighten it by hand.
- If that doesn’t work or the frame is cracked, buy a new screen (30-60 euros)
When you definitely need a professional
There are problems that are dangerous or impossible to fix yourself:
Cracked glass - the shards are dangerous and can cut you. Urgent replacement of the glass unit by a professional is required.
Frame has come loose from the wall - gaps are visible between the frame and the slope from the inside. There is an installation problem; dismantling and reinstallation is required.
Fastening inside the profile has broken - the pin has come off, the mechanism inside the frame has broken. It cannot be repaired without disassembling.
Profile Deformation — The frame or sash has warped due to temperature or poor-quality material. The sash or the entire window needs to be replaced.
Permanent Freezing — The windows are covered with ice from the inside even with normal humidity. The problem lies with the insulating glass unit; it needs to be replaced with a warmer one.
Opening Geometry Is Misaligned — The walls have settled, causing the opening to become warped. The window is not functioning properly due to the building’s geometry being distorted.
Cost of DIY repairs vs. a professional
What you can do yourself:
- Sash adjustment — 0 euros (only an Allen key costs 2-3 euros)
- Handle replacement — 15-30 euros (new handle)
- Seal replacement — 20-40 euros (rubber for the entire window)
- Mechanism lubrication — 10 euros (lubrication for years)
- Pressure increase — 0 euros
- Mosquito screen repair — 5-20 euros
Total: solving typical problems 0-50 euros
Calling a professional costs:
- On-site visit — 60-100 euros
- Adjusting one window — 30-50 euros
- Hardware replacement — 80-200 euros (labor + parts)
- Double-glazed unit replacement — 40-80 euros labor + cost of the double-glazed unit
- Joint repair — 80-150 euros
Total: 100-400 euros per visit
The savings are obvious. 80% of problems can be solved independently in 15-30 minutes for 0-50 euros. Learn the basics—it pays for itself after the first incident.
Prevention is better than repair
Most problems can be avoided with simple maintenance:
- Lubricate the fittings twice a year
- Clean the mechanisms from dirt
- Adjust the pressure seasonally (winter/summer)
- Treat the seals with silicone
- Check the condition of the windows every six months
15 minutes per window twice a year—and you will avoid 90% of the problems described. It’s cheaper, faster, and easier than repairing a broken one.