Cleaning and lubricating window mechanisms
· María Fernández · Repair and maintenance · 15 min read
Window hardware is a complex mechanism consisting of dozens of parts: hinges, locking pins, strike plates, tilt/turn mechanism stays, handles, and locks. All these elements are constantly moving, rubbing against each other, and experiencing stress. Without regular cleaning and lubrication, they wear out, jam, and break. Twice a year for 15 minutes—and your windows will work like new for decades.
Why clean and lubricate hardware
Metal-on-metal friction creates microscopic scratches and wears away the surfaces of the parts. Lubricant forms a protective film between the parts, reducing wear by 5-10 times. Without lubrication, hardware fails in 5-7 years instead of the stated 20-25 years.
Dust and dirt enter the mechanisms through cracks in the profile. Mixing with old lubricant, they turn into an abrasive paste that acts like sandpaper. Mechanisms become stiff, creaking sounds appear, and wear increases.
Humidity causes corrosion of metal parts. On the Spanish coast, salty air accelerates this process by 2-3 times. Rust blocks moving parts, sashes become unresponsive, and hinges jam. Lubricant creates a protective barrier against moisture.
Temperature fluctuations in Spain reach 50 degrees Celsius between winter and summer. Metal expands and contracts, and gaps in mechanisms change. Without lubrication, parts catch on each other, causing jamming.
Saving on cleaning and lubrication leads to expensive repairs. Replacing hardware costs €150-€300 per window, and calling a technician adds another €60-€100. A €10 can of lubricant will solve these problems for 2-3 years.
When to clean and lubricate hardware
Regular maintenance — twice a year, in spring and fall. In spring (March-April), remove winter dirt and lubricate before the busy summer season. In fall (September-October), prepare the mechanisms for the wet winter period.
Additional maintenance is necessary:
- After home renovations — construction dust clogs all mechanisms
- After strong winds with sand or dust (calima in southern Spain)
- If the windows haven’t been used for a long time (dacha, second home)
- If creaking, sticking, or stiffness in the handle occurs
New windows should be lubricated for the first time 6 months after installation. The factory lubricant is designed for transportation and the initial period, but it is used up quickly. After that, the standard twice-yearly schedule applies.
Coastal areas require more frequent maintenance — every 4-6 months instead of every 6-12 months. Salty air is more aggressive, and moisture washes away lubricants faster.
Which lubricant to use
Special lubricant for window hardware is the best choice. It is designed for use in a wide temperature range (-30°C to +80°C), does not thicken in cold weather, does not run in hot weather, and protects against corrosion.
Product forms:
- Aerosol with a straw – convenient for hard-to-reach areas
- Oiler with a spout – precise dosing
- Tube of thick lubricant – for hinges and heavy-duty components
Popular brands: Roto (specifically for windows), WD-40 Specialist (white lithium grease), Liqui Moly Silicon-Spray, and products from hardware manufacturers (Siegenia, Maco, Winkhaus).
Classic WD-40 (blue can) is suitable for one-time cleaning and light lubrication, but it is not a full-fledged lubricant. WD-40 displaces moisture and dissolves dirt, but evaporates quickly. Use it for cleaning and then apply a real lubricant.
Silicone grease is good for rubber seals and plastic parts, but is less effective for metal hardware. It cannot withstand heavy loads on hinges and locking mechanisms.
Lithium grease (white or clear) is excellent for all mechanisms. It withstands heavy loads, is water-resistant, and works over a wide temperature range. Choose lithium grease in an aerosol can for easy application.
Machine oil such as I-20A can be used, but it is less convenient. It runs off in hot weather, attracts dust, and requires more frequent refilling.
What NOT to use:
- Solidol, Litol-24, and other thick automotive lubricants are too thick, clog delicate mechanisms, and attract dirt.
- Vegetable oil oxidizes, becomes sticky, and collects dust.
- Vaseline destroys rubber seals and doesn’t work well in cold weather.
- Liquid sewing machine oils are too thin and run off quickly.
Tools and Materials
For a thorough cleaning and lubrication, you will need:
Required:
- Hardware lubricant (aerosol or oiler)
- Clean cotton rags or lint-free cloths
- Old toothbrush or stiff brush for cleaning
- Flathead and Phillips-head screwdrivers (for removing handles)
- Vacuum cleaner with a narrow nozzle
Optional:
- WD-40 or other solvent to remove old grease
- 4mm Allen key mm (for adjusting the hinges)
- Flashlight (for inspecting hard-to-reach areas)
- Gloves (if you have sensitive skin)
- Old newspaper or window film (to prevent staining the floor)
Step-by-step cleaning and lubrication instructions
Step 1: Preparation
Open the sash to the pivot position to access the end face and hinges. Inspect all visible hardware—hinges, locking pins on the end face of the sash, and strike plates on the frame.
Place newspaper or film under the window. Dirt and grease will fall and drip during cleaning. It’s best to protect the floor and windowsill.
Inspect the mechanisms—look for signs of rust, old, thickened grease, and dirt accumulations. Note or photograph problem areas.
Step 2: Cleaning the Mechanisms
Remove coarse dirt with a vacuum cleaner fitted with a narrow nozzle. Vacuum the end face of the sash, the grooves on the frame, and the hinges. Remove dust, cobwebs, and construction debris.
Scrub off old grease with a stiff brush or toothbrush. Thickened grease mixed with dirt acts as an abrasive and must be removed.
For heavily soiled mechanisms:
- Apply WD-40 to dirty areas
- Wait 2-3 minutes to dissolve the dirt
- Brush
- Wipe dry with a clean cloth
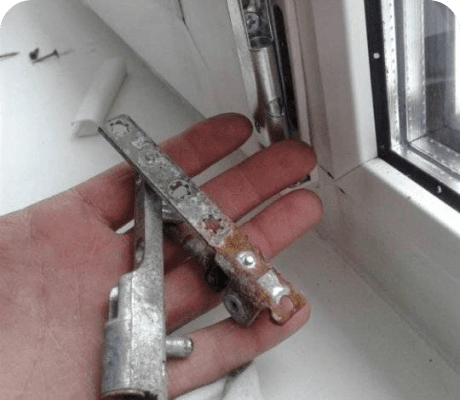
Clean the locking pins on the end of the door leaf—these are the oval or round projections that engage the striker plates on the frame when closing. Wipe off any dirt and old grease from each pin.
Clean the striker plates on the frame—the metal plates with grooves into which the pins engage. Remove dirt from the grooves with a brush or cloth.
Clean the hinges—both the top and bottom. Remove the decorative trims (usually just snapped on). Remove any dirt from the hinge gaps. Don’t completely disassemble the hinges—this is difficult and unnecessary for maintenance.
Clean the tilt mechanism stays (for tilt-and-turn windows)—this is the lever structure at the top of the sash that holds the sash in the tilt position. Wipe off any dirt from all hinges.
Step 3: Lubricate the Hinges
The bottom hinge is the main, loaded hinge that supports the weight of the sash.
How to lubricate:
- Apply 2-3 drops of lubricant or a short spray (1 second) to the top of the hinge.
- The lubricant will flow down and spread along the hinge axis.
- Open and close the sash 5-6 times to distribute the lubricant.
- Apply a small amount of lubricant to the hinge adjustment screws (if visible).
The top hinge is lubricated in the same way: apply a drop of lubricant to the top, then open and close the sash to distribute the lubricant.
Tilt mechanism hinge (if equipped):
- Move the sash to the tilt position.
- Apply a drop of lubricant to each hinge of the hinge (usually 3-4 points).
- Close the sash and tilt it again to distribute the lubricant.
Wipe off any excess lubricant with a clean cloth. Drip lubricant attracts dust and should be removed.
Step 4: Lubricating the Locking Mechanism
The locking pins on the end of the sash are the oval projections you cleaned.
How to lubricate:
- Apply a drop of lubricant to each pin (there may be 3 to 9 depending on the window size).
- Turn the handle up and down several times to distribute the lubricant as the pins move.
- Close and open the sash 3-4 times.
The striker plates on the frame: Apply a drop of lubricant to each groove where the pins engage. When the sash closes, the lubricant from the pins will spread across the striker plates.
The middle striker plate (if present) is a long metal bar on the side or top of the frame. Apply a few drops of lubricant along the striker plate.
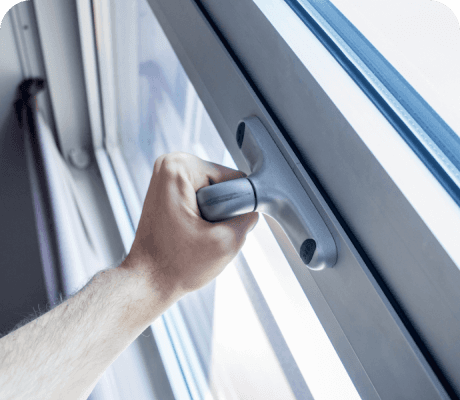
Step 5: Lubricating the Handle
The handle has an internal mechanism that prevents accidental switching and connects the handle to the locks.
Simple lubrication without disassembly:
- Apply 1-2 drops of lubricant to the gap between the handle and the decorative cover
- Turn the handle up and down 10-15 times to distribute the lubricant
Full lubrication with disassembly (every 2-3 years):
- Rotate the decorative cover at the base of the handle 90 degrees (from vertical to horizontal)
- Loosen the two screws under the cover with a Phillips screwdriver
- Remove the handle by pulling it toward you
- Clean any dirt from the lock mechanism with a brush
- Apply lubricant to the metal parts of the mechanism
- Reinstall the handle, tighten the screws, and replace the cover
Handle lock (if present) — a keyed mechanism that locks the handle. Apply a drop of lubricant to the keyhole and insert and remove the key several times.
Step 6: Lubricating the soft-close mechanism (if applicable)
The soft-close mechanism (closer) is a mechanism that lifts the door leaf when closing to prevent it from rubbing the seal. It is located at the bottom of the door leaf.
Signs of a soft-close mechanism:
- A distinctive click when the sash closes
- A plastic or metal lever at the bottom of the sash
Lubricating the soft-close mechanism:
- Apply 1-2 drops of lubricant to the moving parts of the lever
- Close and open the sash 5-6 times
- Check operation – there should be a clear click without any sticking
Step 7: Final Check
Open and close the sash 10-15 times in all modes:
- Pivot mode (full opening)
- Tilt mode (if available)
- Micro-ventilation (if available)
The sash should move easily, without jerking, creaking, or sticking. The handle turns smoothly with equal force in all positions.
Check the clamping force – close the sash on a piece of paper and try to pull it out. It should come out with force along the entire perimeter. If the sheet is easily pulled out somewhere, the pivots or hinges need adjustment.
Wipe all surfaces to remove any traces of grease. Dripping grease will leave greasy stains on the profile and glass—remove these immediately.
Remove newspaper or film from under the window. Check for any grease dripping onto the floor or windowsill.
Lubrication Features for Different Types of Hardware
Casement Windows (Standard)
The simplest design—just hinges and latches. Lubrication takes 10-12 minutes per window:
- Two hinges—1-2 drops in each
- Locking pins—1 drop for each (usually 3-5)
- Striking plates—1 drop in the grooves
- Handle—1-2 drops
Tilt-and-Turn Windows
A more complex system with additional mechanisms. Lubrication takes 15-20 minutes:
- Hinges—lower and upper
- Tilt mechanism stays—3-4 hinges
- Locking pins—usually 5-9
- Perimeter striking plates
- Handle and handle lock
- Soft-close mechanism (if applicable)
Sliding Windows
Another type of mechanism—the sash moves along roller tracks.
What to lubricate:
- Lower sash rollers - one drop per roller (usually 4-6 rollers)
- Upper guides - a few drops along the guide
- Bottom guides - thoroughly clean of dirt, apply lubricant
- Handle locking mechanism
- Sash travel stops
Sliding system guides need to be cleaned more frequently - every 2-3 months. Dirt and dust in the guides quickly wears out the rollers.
Lift-and-slide systems (PSK, HST)
Complex hardware with a sash lift mechanism:
- All rollers - thoroughly clean and lubricate
- Lift mechanism - multiple hinges and levers
- Locking points around the perimeter of the sash
- Handle with lock
Maintenance takes 25-30 minutes per sash. Professional maintenance is recommended once a year due to the complexity of the mechanisms.
Features for Different Climate Zones in Spain
Mediterranean Coast (Costa Blanca, Costa del Sol)
Challenges: Salty air, high humidity, sea fog.
Recommendations:
- Lubricant with anti-corrosion additives is essential.
- Maintenance frequency: every 4-6 months instead of every 6-12 months.
- Remove salt deposits from fittings every time you wash your windows.
- Check for rust on screws and hinges.
Southern Regions (Andalusia, Murcia, Almeria)
Challenges: Extreme heat, dust, rare but heavy rainfall, calima (Saharan sand).
Recommendations:
- Use heat-resistant lubricant that does not run off at +40°C
- Thoroughly clean mechanisms of dust and sand
- Perform unscheduled cleaning after each heating cycle
- Light-colored plastic profiles heat up less
Northern Coast (Galicia, Asturias, Basque Country)
Problems: Constant humidity of 75-85%, frequent rainfall, and sea winds.
Recommendations:
- Waterproof lubricant that does not wash out with moisture
- Check drainage holes—stagnant water causes corrosion
- Check rubber seals more frequently
- Treat hardware with anti-corrosion agents
Central Regions (Madrid, Castile)
Problems: Large temperature fluctuations between winter and summer, dry air, and dust.
Recommendations:
- Grease with a wide temperature range (-20°C to +45°C)
- In the fall, lubricate thoroughly before cold weather sets in
- In the spring, check to see if the grease has thickened over the winter
- Remove dust regularly, preventing it from mixing with the grease
Common Lubrication Mistakes
Too much lubrication — more is not better. Excess lubricant runs down, stains the profile, and attracts dust. 1-2 drops per spot is sufficient.
Lubricating without pre-cleaning — applying new lubricant over dirty old lubricant does not help. Abrasive paste continues to wear out the mechanisms.
Using the wrong products — Thick automotive lubricants, vegetable oil, and Vaseline are more harmful to hardware than helpful.
Forgetting about hinges — 80% of people only lubricate the latches and handle, ignoring the hinges. Hinges are the most stressed component, and without lubrication, they wear out first.
Lubricating rubber seals with regular grease — Oil-based lubricants destroy the rubber. For seals, use only silicone spray or special products.
Not wiping off excess — dripped lubricant collects dirt, creating an abrasive mass. Always wipe off excess after use.
Irregular maintenance — lubrication every 3-4 years or never at all. The fittings wear out, and then people wonder why €800 windows broke after 5 years.
Signs of insufficient lubrication
Squeaking when opening and closing — metal rubbing against metal without a lubricating film. Urgent lubrication is required, otherwise accelerated wear will occur.
Handle stiffness — force must be applied to turn the handle. The mechanism inside is clogged or the lubricant has dried out.
Stuck when closing — the sash does not close smoothly, but jerks. The locking pins are dirty or dry.
Sagging sash — the bottom of the sash touches the frame when opening. Hinges are worn due to operating without lubrication under heavy loads.
Uneven pressure — the sash fits tightly in some places, while there is a gap in others. The locking mechanisms operate unevenly due to varying degrees of wear.
Rattling in the wind — a poorly clamped sash vibrates. Worn locks do not provide a tight seal.
If you notice these signs, clean and lubricate immediately. The sooner you begin maintenance, the less wear will occur.
Preventive Maintenance Between Maintenance
Regular ventilation reduces indoor humidity, reducing hardware corrosion. This is especially important for bathrooms and kitchens.
Handle with care — do not slam the sashes, do not pull the handle with force, and do not hang on open sashes. The mechanisms are designed to withstand a certain load.
Do not keep the sashes wide open for long periods in strong winds — wind loads can loosen the hinges. Use opening limiters or locks.
Wash windows without harsh cleaners — acids and alkalis remove the protective coating from the hardware, accelerating corrosion.
Keep an eye on the seals — damaged seals allow moisture to penetrate the hardware. Replace worn rubber promptly.
When professional help is needed
Do-it-yourself cleaning and lubrication solves 95% of maintenance problems. However, sometimes a specialist is needed:
The hardware is jammed after lubrication — a component inside the mechanism may have broken or become seriously deformed.
The sash is sagging and cannot be adjusted. The hinges are worn and need to be replaced.
The handle spins or won’t lock into place. The internal mechanism is broken.
There are signs of severe corrosion. Surface rust can be removed, but deep corrosion requires replacement.
The windows haven’t been used for several years. The mechanisms may have rusted and require professional inspection before use.
A technician’s visit costs €60-€100. Comprehensive service with adjustments costs €80-€150. This is cheaper than replacing the hardware, which costs €200-€400.
Maintenance Cost
DIY Maintenance:
- Hardware lubricant 150-200 ml — €10-15 (enough for 2-3 years for a house with standard windows)
- Rags and brush — available at home
- Time: 15 minutes per window, 1-2 hours for the entire house
Professional Maintenance:
- Cleaning and lubrication of one window — €25-35
- Comprehensive maintenance with adjustments — €40-60 per window
- On-site service — €60-100
For a house with 8-10 windows, professional maintenance costs €300-500. DIY maintenance costs €10-15 every 2-3 years. The difference is clear.
Proper cleaning and lubrication is not difficult or expensive, but it is critical for the long life of your windows. 30 minutes twice a year will save you thousands of euros on repairs and extend the life of your windows by 10-15 years. Don’t neglect maintenance—your windows will thank you.